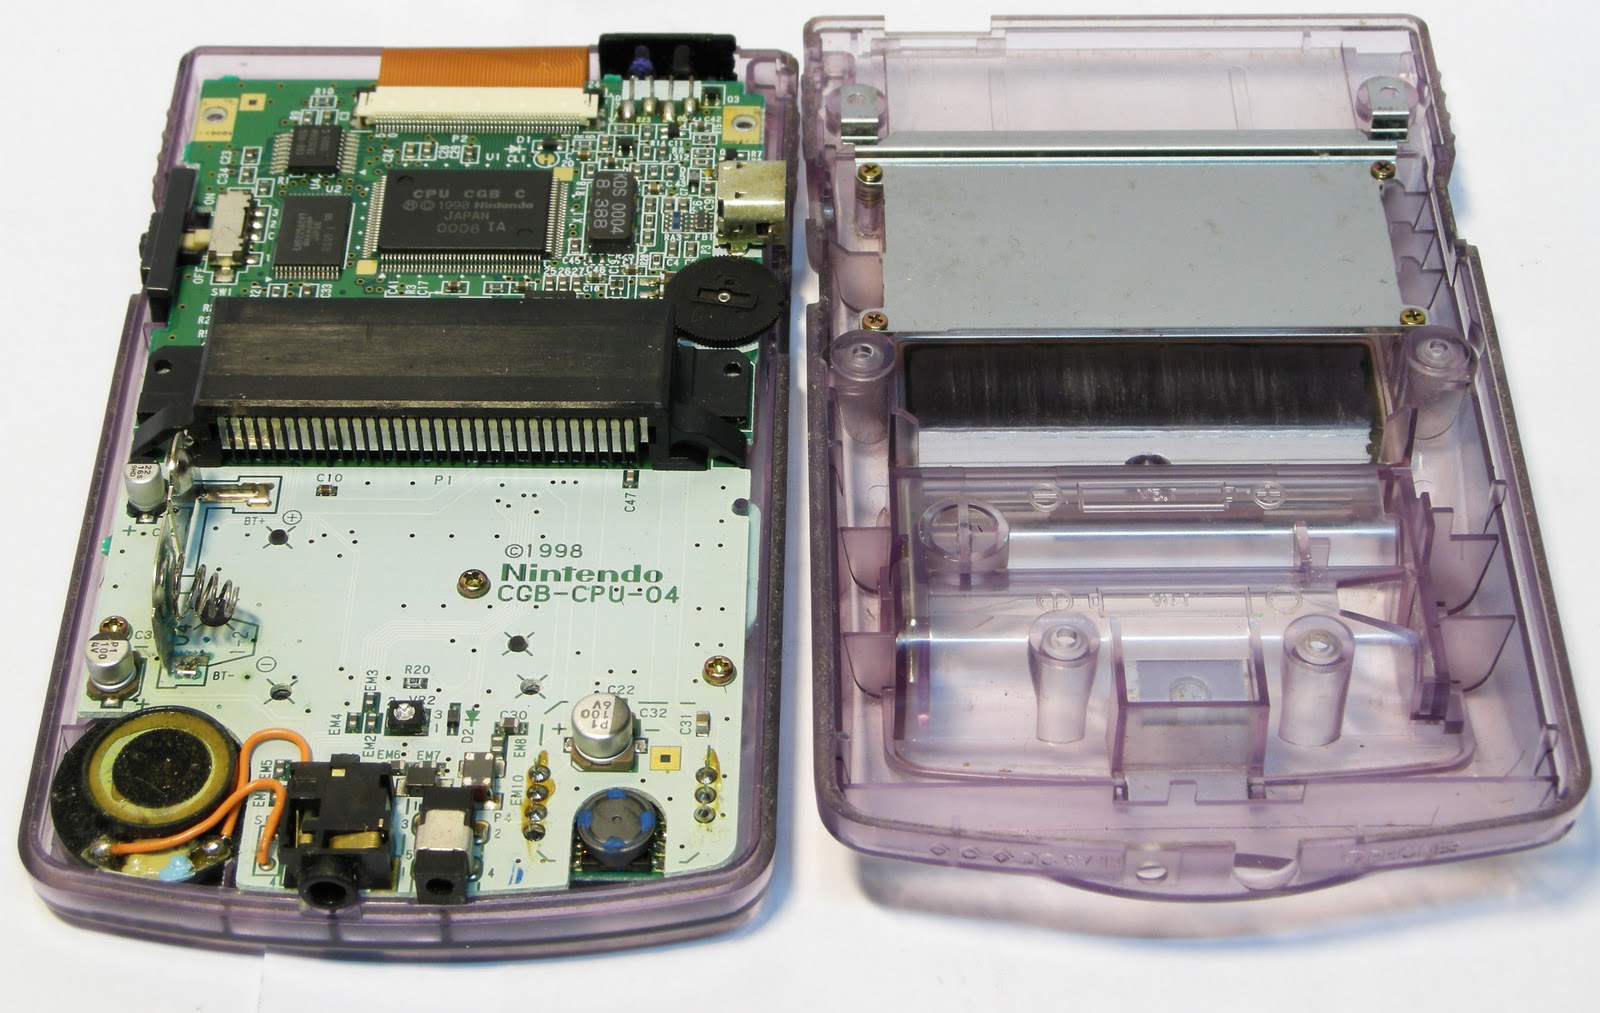
helped a friend fix a gameboy color, apparently the A and B buttons don't work anymore.
the game 'included' is mario golf...tried playing it for a few minutes and i totally lost interest...mario should be best left climbing down sewer pipes and saving princess peach and not playing golf...maybe even take up go-karting but definitely not golf...
it was a very straightforward task, in fact the hardest part was trying to get it open because well you see, apparently screwdrivers were made differently back in the 90's...no i'm kidding it's probably some special screw to discourage kids from opening up their gameboys and making super gundam robots out of them:
anyway, all that was needed was a small enough flathead screwdriver to jam inbetween two of the three holes in the screw and it was enough to turn them.
the powerful 8MHZ processor with 32KB RAM and 16KB GFX processor!!!
the last picture shows the culprit of the malfunctioning buttons. it seems a layer of dust/corrosion built up on the contacts and some contact cleaning fluid and cotton buds got rid of it. all in all it works as good as it should right now, it should work as long as it is not neglected for the next decade or so!
oddly, even after i manually removed all of the visible dust out of the game cartridge and slot on the gameboy, the game still has glitches when you first slot it in. the one and only way to fix this is to blow air into the game cartridge and it works again...seems like that is the only way to get games of the 90's to work properly.
EDIT: PLEASE READ!!!! before attempting any sorts of repairs to any sort of antique clock be aware that the luminous paint used on the face might contain radium which is extremely risky if it is ingested and/or inhaled. this can happen when you open the clock and the dust from inside gets out. if it glows regardless of whether you charged the face with an external light source or not then it surely contains radium or other radioactive substances and must be treated with care!
i have tested this clock for a few days already and it works fine and keeps accurate time. there is actually a way to set the speed of the regulator on the back of the clock to fine tune the time if it ever goes too fast or too slow. i suppose it was built in to take into account that the springs/regulator might not be consistent in the future and gave the option to recalibrate the timing.
the alarm works on time, and is LOUD...they weren't kidding when they put the 'loud alarm' wordings on the face. the clock is effectively one big bell and the internal striker hits the side of the clock and it sounds just like a fire bell (just not at such a high frequency). there is no 'snooze button', the alarm is toggled on and off by a knob at the back. the alarm will keep ringing for about 10 seconds, then stop for about 5, then ring again and will keep repeating this cycle until the alarm spring is unwound (about 2mins of ringing) so you will definitely wake up when this clock rings!
the clock itself runs for about 24 hours one a full winding. if the clock is left running until the spring has fully unwound, all that is needed to restart it is to wind it back up again and it should restart. i tried this a few times and there are times where the regulator doesn't kick in and all that is needed is a little jerk in the clockwise/anticlockwise direction and the clock starts up again without fail.
EDIT: PLEASE READ!!!! before attempting any sorts of repairs to any sort of antique clock be aware that the luminous paint used on the face might contain radium which is extremely risky if it is ingested and/or inhaled. this can happen when you open the clock and the dust from inside gets out. if it glows regardless of whether you charged the face with an external light source or not then it surely contains radium or other radioactive substances and must be treated with care!
spent about an hour plus just polishing the plastic lens of the alarm clock...it isn't done yet and still requires a few more rounds of polishing especially around the sides but i think i did a pretty good job.
i used sandpaper (grade 2000) on the lens and then followed up with this plastic polisher, novus:
i came across this brand while researching online for something to clear up the badly fogged lens. it is very good for cleaning most kinds of plastics and comes in three grades. novus number 3 is for clearing deep scratches, novus number 2 for fine scratches and novus number 1 is just for cleaning and also gives the newly polished plastic a nice shine. i used novus 2 and 1 as i felt that the sandpaper would be equivalent to novus 3, works well enough!
i fixed the alarm issue and it rings on time now. i oiled the gears that i suspected are causing drag on the mechanism and now it doesn't stop every 30 seconds but it still stops after a few hours on its own. it needs a little jerk before it starts up again so i know that it is definitely a gearing issue...maybe dirt or rust causing a gear to stop every now and then.
EDIT: PLEASE READ!!!! Before attempting any sorts of repairs to any sort of antique clock be aware that the luminous paint used on the face might contain radium which is extremely risky if it is ingested and/or inhaled. this can happen when you open the clock and the dust from inside gets out. If it glows regardless of whether you charged the face with an external light source or not then it surely contains radium or other radioactive substances and must be treated with care! There was no visible glow whatsoever when I obtained this clock, whether in the dark or light. It only glows when I shine an external light source on to the face but it fades away after a few minutes and I have been informed that this behavior means that it is unlikely to be radium. Nevertheless I will continue to treat this clock as mildly radioactive and keep it a distance away until I can confirm it is indeed not radioactive. For more information please read the comments below.
obtained this antique alarm clock recently but haven't had the time to do much work on it yet, but i managed to take it apart and snap some photos. i personally think that it is an absolutely gorgeous looking clock and will not be touching up on its exterior because the beauty of this clock is the ruggedness that comes with its aged look.
a few problems, to name a few:
1. the face is OBVIOUSLY seriously fogged up, i don't know if it's due to age or due to exposure to the elements.
2. the mechanism doesn't run for more than a few seconds before stopping. the gears require my coaxing to run but it will just seize up on its own after maybe 30 seconds, could be a problem with the spring, or perhaps the gears need oiling.
3. the alarm setting is off by about an hour and requires calibration. meaning if i set the alarm at 5pm, it will ring at 4pm instead and that is NOT a reliable clock!
4. the luminous paint on the minute hand is flaking off even as i'm handling it (carefully) but i don't think anything can be done about that.
i managed to identify the make and model of the clock from this website
from the examples on the website, this clock should be a style 6 model 211 alarm clock built between 1949 - 1956 so it is at least 50 years old. they sell modern replicas of this clock online, but those are powered by batteries which are nowhere as classic as this particular one i have which needs daily windings to keep it going.
i managed to take it apart right down to the gearings without much difficulty, but i am a little daunted by the complexity of this clock. granted, it is not a grandfather clock or something very complex but this is my first experience with a clockwork mechanism of any kind.
that's a lot of gears for a first timer like me to handle but i will work at it and hope that my gamble in purchasing this clock will pay off if i can repair it.
if i am unable to fix it...then...well it'll still make a nice display piece on a cupboard, but it'd be 500% nicer if it worked. i can't think of anything to clear up the fog on the face, no rubbing or cleaning would get it off...that'll be a huge problem as well if it works but you can't see the face!
restoring this gramophone took a good 3 months, although most of the time spent during that period is waiting for spare parts to arrive from overseas. i think it took around a full week of man-hours to scrub out most of the rust and fine tune the motor.
here's a picture (not well taken) of when i first got it:
the leatherette was falling apart at the corners, there was a huge mound of dust underneath the motorboard, and the motor didn't even work to begin with. i started off by spraying every metal part with WD-40 (my new best friend) to loosen the rust and scrubbed with a metal brush. the tonearm is originally chrome with a mirror finish, unfortunately corrosion has eaten away most of the chrome right down to the brass(?) piping. i did the best i could but it is far from how it is originally supposed to look like.
the motor was badly clogged with dust and congealed oil. i removed everything (gears, spring, etc) and again...cleaned with WD-40.
before:
after:
this gramophone was designed to play 78rpm records which are pretty rare nowadays. when i mean rare, i mean records with songs that i know and would like, there are hundreds and hundreds of obscure artists and songs on 78's records that i have found but dare not buy because i might not like them. i go around looking for records that are more 'popular'...but sadly those are set at a 'non-popular' price.
the old spring had issues maintaining a proper speed. it kept fluctuating between 76-79 rpm which is close enough if you think about it, but the variations in speed meant that the pitch of the song changes as well. it is kind of irritating to listen to a song that way, but thankfully the new spring solves that problem and maintains a steady 78rpm give or take a puny decimal place.
while searching online, i found an ingenious way of checking the turntable's speed with the use of a strobe disc. it is basically a circle of lines that are equally spaced apart and when the turntable is moving at 78rpm the lines would seem to be standing still. i fine tuned the motor speed selector until it registered 78rpm and left it at that.
the original soundbox that came with the gramophone turned out to be a cheap replica made in india. apparently it was extremely common with gramophones that were bought in south-east asia and were a standard issue. i looked online for an authentic soundbox and found a HMV 5b that was in need of repair and i had it shipped over. when it arrived, it was missing a rubber connector and had a hole in the diaphragm that affected the sound output.
i bought a rubber connector and a new diaphragm, but the 'new' diaphragm came with a hole as well and i got a refund for it. unfortunately that still left me with a leaky diaphragm and i couldn't find any new ones online (at least for now).
i ended up gluing some aluminium foil over the hole which seems to be a good fix. it won't sound 100% as good but it was much better than leaving the hole there for all the sound to leak out of.
i use modern needles bought from a guy in the US to play my records. although i do have some old needles left over from the original owner of the gramophone, i try not to use these as i trust the modern needles would do less wear and tear on the records, but i did manage to buy an original needle tin just for the sake of completing the collection!
needle tins are a collector's item as they come in thousands of designs and varieties. some claim that their needles are able to play hundreds of records before needing to be replaced, but modern science discovered that each needle is only good for one, at the most two, plays before a new needle is needed otherwise the worn out tip would gouge out the grooves of a record. this tin that i have states that each needle is good for 20 plays which is a lie! sure it'll play for 20 plays, but the record would sound like crap after awhile when the grooves are all gone. rare needle tins have sold for more than 100++ USD, this one that i have is a pretty common one but could still be worth something in the future so i'll be holding on to it for some time.
well the awesome thing now is that the gramophone works...it might not sound as good as it is supposed to sound but it is good enough for me. maybe one day i'd come across someone who is selling the diaphragm and i'll be able to hear the songs like how they're supposed to be, until then i'll be happy with what i have!
and in case you didn't know, this is a portable gramophone that folds up nicely into a suitcase to carry around.
and finally here's a video of it in operation, playing sundown boogie by bill haley and his comets.
the gramophone mainspring FINALLY arrived in the mail from the netherlands. i ordered it before christmas and it took nearly 3 weeks to arrive. must have took so long because of all the backlog of gifts and crapola the mail people must clear...
anyway so it arrived and i unpacked it, and it looked harmless enough...just a coil of metal, waiting to be crammed into a small container like so:
i removed the cableties and slowly removed the metal wire holding the spring together, and when i remembered: "hey, don't coiled springs have a lot of stored power?", the spring exploded outwards in 360 degrees. i got a nice mark on my arm as a reminder not to be stupid next time.
took me nearly 30 minutes to cram the new spring into the container, whereas the old spring took me only 5...all i can say is that this new spring is definitely able to store more force than the old one.
so there, it's done...i finally managed to fix this antique, i will take a video of it in action and post it up soon.
i obtained this gramophone from my girlfriend's family a few months ago. i do not own it, they just lent it to me on a long term loan due to my fascination with old stuff. i decided to clean it up and restore it as well as i can. i did take a few pictures before starting and it was in a really bad state.
i removed the soundbox from the tonearm as it was rusted beyond repair.
this has definitely seen better days.
the motorboard housing, with every metal part rusted and every corner/hole clogged with dust
the spring motor, badly rusted and congealed grease
the round object at the end of the arm that is covered in rust is the soundbox, which is the means and ways of how the gramophone produces sound in the first place...and it...is...an absolute write off...
work is still in progress on this machine, which i have been told by an online forum that it was produced in 1954, which makes this gramophone nearly 60 years old. so far it refuses to stay fixed, with some other part failing once one other part has been fixed, but i will be very satisfied once it is restored to a respectable working order.
spent the afternoon cleaning up the camera and working the shutter, everything seems fine now. it was very dusty inside, thankfully it wasn't hard at all to get it open.
i removed the top cover and cleaned up the internal optics
squeeky clean!
there is glass in the middle don't forget!
there was some sort of oily residue on the ground glass, shutter mirror and lens which i had to keep cleaning over and over before i was satisfied it was spotless.
the good news is that i managed to knock the flash shoe back into position! but the bad news is that i don't think i'll be able to do the same for the dent on the rim of the lens. this means that it is unable to mount any kind of filter, at least i THINK you can put a filter in the first place because i see the threads on the rim of the lens. anyway i kind of like it that way with the dent, god knows what this camera has seen or been through before i found it...
i was able to mount and secure my vivitar auto 2600 flash (which is also about 10-20 years old) and it fits nicely, if only i had the cable then i'd be able to test to see if the sync port on this camera works...
*EDIT* forgot to mention that it is also a hotshoe, meaning a normal flash would work on it as well. i tested this vivitar flash and it works fine in sync with the shutter.
the optics are much better now after cleaning, no more hazy vision as i've cleaned out the grime from the viewfinder and mirror and i've also manage to focus well enough to take a picture through the magnifier.
one minor problem is that this camera's shutter is very heavy (at least it sounds that way during operation) and since the internals are far from airtight no amount of cleaning is going to keep the dust away. there are a few corners that i am unable to clean out as well, and what this does is that each time the shutter slams shut, the air pressure from the shutter stirs up a little dust inside and lands on the mirror. so i have resigned myself to accept that the optics will never be 100% clean, but the bottom line is that it is much better now than in the beginning.
all that's left is a little more cosmetic surgery as the leatherette is loose in a few corners and it'll be good to go.
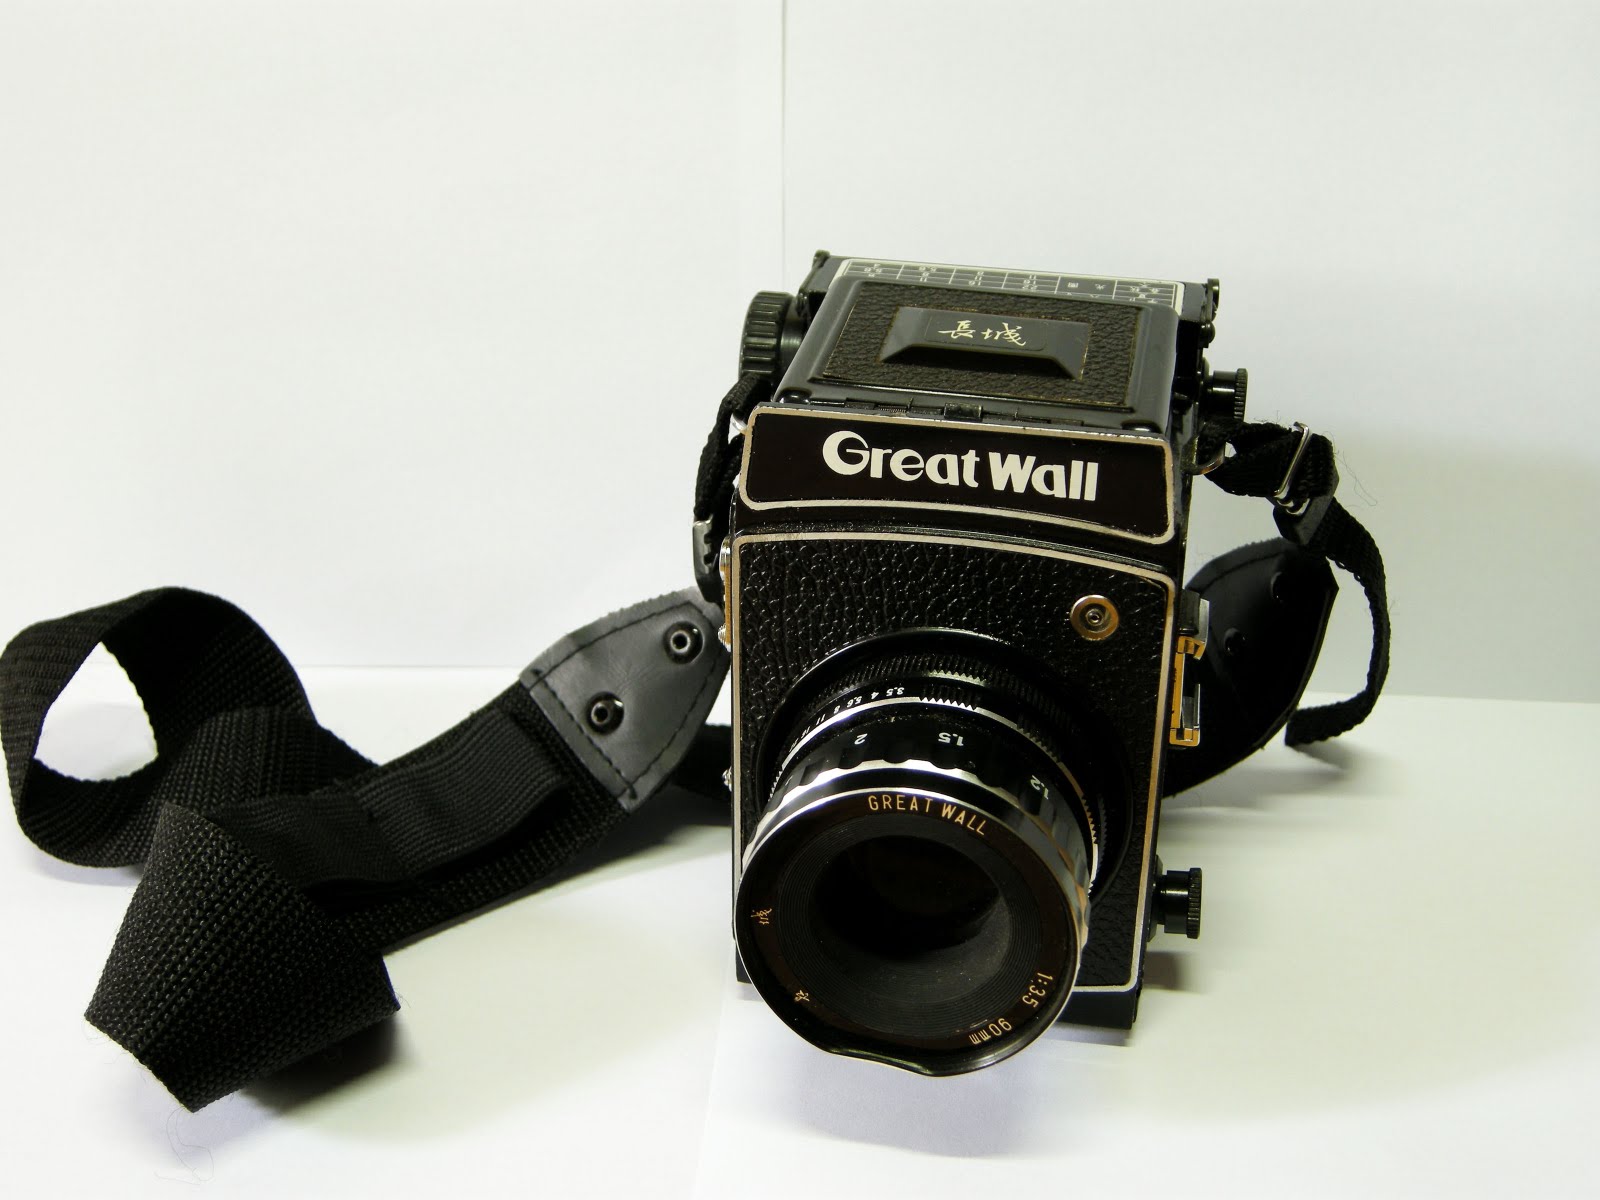
bought this camera yesterday, needs a little work but otherwise it's in working condition.
As you can probably tell from the name, it's made in China and came in a few variants. This one is a DF-4, and it has a flash shoe with a PC-sync contact (can't test whether it works as I don't have a sync cable), a self timer (working), cable release socket (working). This is a 120mm medium format SLR built in the 1980's.
it comes with a 90mm lens, with focusing from 1 meter to infinity. The aperture ring on the lens ranges from 3.5f to 22f.
the shutter speeds available are 1/200s, 1/125s, 1/60s, 1/30s and bulb.
cosmetically, the lens has a dent on the edge but otherwise is in good condition, definitely needs a little cleaning but I can't see any fungus or mold inside. The viewfinder is a little dusty with specks all around but does not obstruct or impair vision.
the flash shoe is also bent inwards as you can see from the picture, and i can't fit a flash into it now. hopefully i will be able to bend it back into position.
here's a closeup of how the viewing port looks like
since it is a SLR, what you're seeing through the viewfinder is the exact image through the lens. this means that the depth of field and overall brightness of the image in the viewfinder changes as well when you change the aperture (live preview).
the viewfinder comes with a flip up magnifier and would be very useful to get the precise focus. it is very clear and sharp but the pictured example doesn't do it justice as i couldn't get a proper focus.
there is a exposure chart just behind the viewfinder but it is in chinese. i never figured out how to use one even when it is in english, but it is nice to have one anyway.
the camera comes with a 4.5cm x 6cm frame which would fit 16 shots on a 120mm roll of film. there were other frames built for this camera that would fit other sizes like 6cm x 6cm or even for 35mm films but are rare and hard to find.
the shutter speed selector is also the winding knob for cocking the shutter. after the film is wound to the next frame, the shutter speed knob needs to be cranked anti-clockwise to wind the shutter into position and you're ready to shoot.
the knob above the shutter speed selector is actually a catch to prevent (or enable) double exposures. By default, after taking a picture, the shutter speed knob cannot be wound again until the film is advanced by one frame. but by pushing this knob upwards, the shutter can now be wound again and a double exposure can be taken.
this is very useful as it stops you from unintentionally taking a double exposure, while giving you the option do make one if you choose to.